このブログはワードプレスのテーマ「Cocoon」を使っています。
今回はこの Cocoon の目次をおしゃれにカスタマイズするCSSを紹介します。
有料テーマSANGO風の目次に大変身するので無料でもCSSのコピペができれば十分有料テーマ並のサイトを作ることができます。
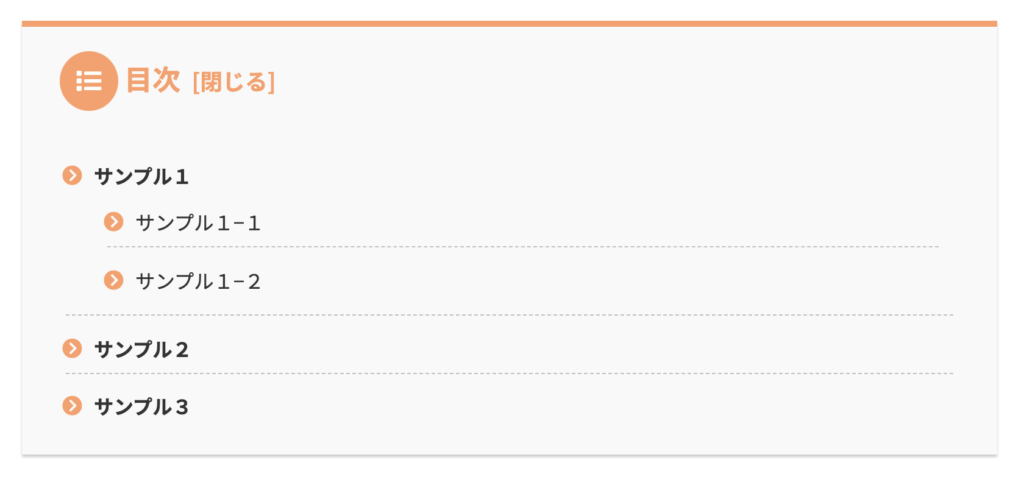
完成イメージがこちら

すでに見出しの上に表示されていると思いますが、画像をぺたりと貼り付けておきます。
では、早速カスタマイズしていきます。
目次カスタマイズの手順
カスタマイズ手順は以下の通り。
STEP01
Font Awesomeの変更管理画面でFont Awesome 5 に設定STEP02
CSSのコピペstyle.css にコードをコピペ
管理画面でFont Awesome 5 に設定
まずは管理画面にアクセスし「Font Awesome」の設定をします。
ワードプレスの設定画面へ
管理画面 >> Cocoon 設定 >> 全体

サイトアイコンフォントを「Font Awesome 5 」にチェックをいれて保存をします。
style.css にコードをコピペ
CSSのコードを style.css に貼り付けます。
/* 目次
-------------------------------------------------- */
#main .entry-content .toc {
  /* 目次全体デザイン */
  background: #F9F9F9;
  /* 目次全体の背景色を変える場合はここを変更 */
  border: none;
  display: block;
  border-top: 5px solid;
  border-top-color: #ff9f67;
  box-shadow: 0 2px 2px rgba(0, 0, 0, 0.2);
  padding: 20px 25px;
}

#main .entry-content .toc .toc-title {
  /* 目次の文字指定 */
  text-align: left;
  margin: 0 20px 20px -10px;
  padding-left: -20px;
  font-size: 23px;
  font-weight: 700;
  color: #ff9f67;
  /* 目次の文字色を変える場合はここを変更 */
}

#main .entry-content .toc .toc-title:before {
  /* 目次のアイコン設定 */
  top: 0;
  left: -45px;
  width: 50px;
  height: 50px;
  font-family: "Font Awesome 5 Free";
  content: "\f03a";
  /* アイコンを変える場合はここを変更 */
  font-size: 20px;
  margin-right: 5px;
  color: #FFF;
  /* アイコンの色を変える場合はここを変更 */
  background-color: #ff9f67;
  /* アイコンの背景色を変える場合はここを変更 */
  border-radius: 50%;
  -webkit-border-radius: 50%;
  -moz-border-radius: 50%;
  padding: 14px;
}

#main .entry-content .toc .toc-content ol {
  /* 目次のデザインカスタマイズ */
  padding: 0 0.5em;
  position: relative;
}

#main .entry-content .toc .toc-content ol li {
  line-height: 1.5;
  padding: 0.7em 0 0.5em 1.4em;
  border-bottom: dashed 1px silver;
  list-style-type: none !important;
}

#main .entry-content .toc .toc-content ol li:before {
  /* 目次の各節の先頭にあるアイコンを設定 */
  font-family: "Font Awesome 5 Free";
  content: "\f138";
  /* アイコンを変える場合はここを変更 */
  position: absolute;
  left: 0.5em;
  color: #ff9f67;
  /* 色を変える場合はここを変更 */
  font-weight: bold;
}

#main .entry-content .toc .toc-content ol li:last-of-type {
  border-bottom: none;
}

#main .entry-content .toc .toc-content .toc-list li {
  font-weight: 700;
  /* h2のみ太文字に */
}

#main .entry-content .toc .toc-content .toc-list li li {
  font-weight: normal;
  /* h3以降の文字サイズを普通に */
}
以上で実装完了です!!
記事に移動しおしゃ〜〜〜れな目次に大変身している確認してみてください。♩
参考にさせていただいた Y&K Studio さんありがとうございました!!
h3 タグ以下の見出しのアイコン変更
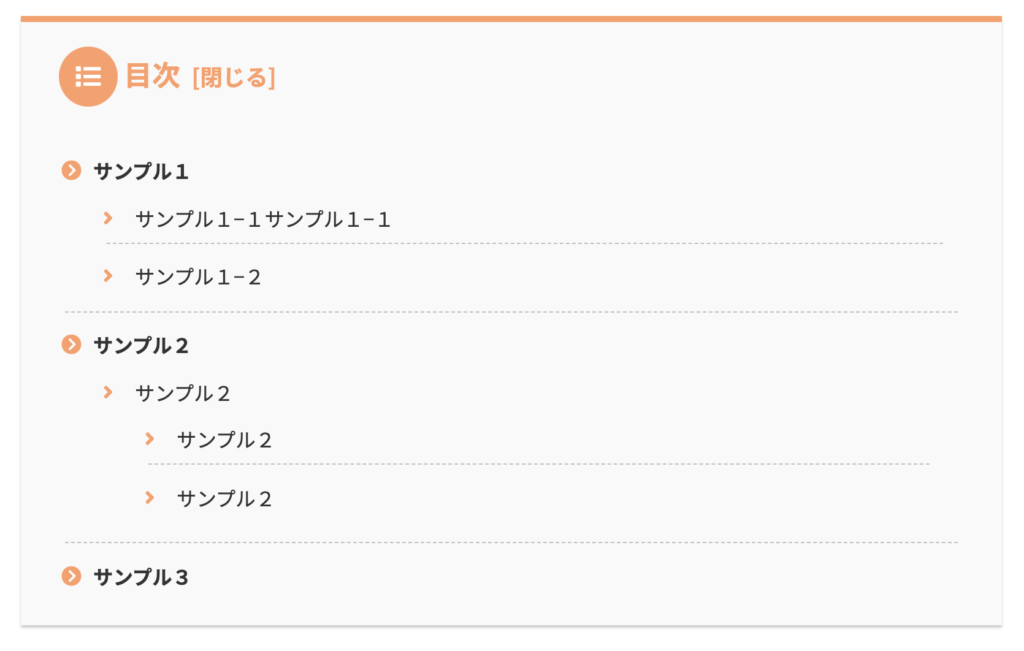
上の例では見出しのアイコンは共通でしたが、h3 タグ以下のアイコンを変更したい場合は次のCSSを使うことで実現できます。
完成イメージ

style.css にコードをコピペ
CSSのコードを style.css に貼り付けます。
/* 目次
-------------------------------------------------- */
#main .entry-content .toc {
  /* 目次全体デザイン */
  background: #F9F9F9;
  /* 目次全体の背景色を変える場合はここを変更 */
  border: none;
  display: block;
  border-top: 5px solid;
  border-top-color: #ff9f67;
  box-shadow: 0 2px 2px rgba(0, 0, 0, 0.2);
  padding: 20px 25px;
}

#main .entry-content .toc .toc-title {
  /* 目次の文字指定 */
  text-align: left;
  margin: 0 20px 20px -10px;
  padding-left: -20px;
  font-size: 23px;
  font-weight: 700;
  color: #ff9f67;
  /* 目次の文字色を変える場合はここを変更 */
}

#main .entry-content .toc .toc-title:before {
  /* 目次のアイコン設定 */
  top: 0;
  left: -45px;
  width: 50px;
  height: 50px;
  font-family: "Font Awesome 5 Free";
  content: "\f03a";
  /* アイコンを変える場合はここを変更 */
  font-size: 20px;
  margin-right: 5px;
  color: #FFF;
  /* アイコンの色を変える場合はここを変更 */
  background-color: #ff9f67;
  /* アイコンの背景色を変える場合はここを変更 */
  border-radius: 50%;
  -webkit-border-radius: 50%;
  -moz-border-radius: 50%;
  padding: 14px;
}

#main .entry-content .toc .toc-content ol {
  /* 目次のデザインカスタマイズ */
  padding: 0 0.5em;
  position: relative;
}

#main .entry-content .toc .toc-content ol li {
  line-height: 1.5;
  padding: 0.7em 0 0.5em 1.4em;
  border-bottom: dashed 1px silver;
  list-style-type: none !important;
}

#main .entry-content .toc .toc-content ol li:before {
  /* 目次の各節の先頭にあるアイコンを設定 */
  font-family: "Font Awesome 5 Free";
  content: "\f138";
  /* アイコンを変える場合はここを変更 */
  position: absolute;
  left: 0.5em;
  color: #ff9f67;
  /* 色を変える場合はここを変更 */
  font-weight: bold;
}

#main .entry-content .toc .toc-content ol li:last-of-type {
  border-bottom: none;
}

#main .entry-content .toc .toc-content ol li > ol > li:before {
  /* h3以下の目次の各節の先頭にあるアイコンを設定 */
  font-family: "Font Awesome 5 Free";
  content: "\f105";
  /* アイコンを変える場合はここを変更 */
  position: absolute;
  left: 0.5em;
  color: #ff9f67;
  /* 色を変える場合はここを変更 */
  font-weight: bold;
}

#main .entry-content .toc .toc-content .toc-list li {
  font-weight: 700;
  /* h2のみ太文字に */
}

#main .entry-content .toc .toc-content .toc-list li li {
  font-weight: normal;
  /* h3以降の文字サイズを普通に */
}
読むな危険!Cocoon カスタマイズを一挙公開中

このブログでも実装しているCocoonカスタマイズを大公開!!
デザインには正解がないためやればやるほど沼にハマってしまいます。
ですので、Cocoon ユーザーは絶対に読まないでください。


